This Tutorial helps to intigrate google maps to Application. Default android package did not provide google maps library. So we have to add exteranlly or it can be downloadable with android sdk it self.
Step 1: (If you already did this then ignore this step)
Adding Google Maps library to Android SDK :
In Eclipse : Window -> Android Sdk and AVD Manager
Then the following window will appear.
 In that window Select Available Packages
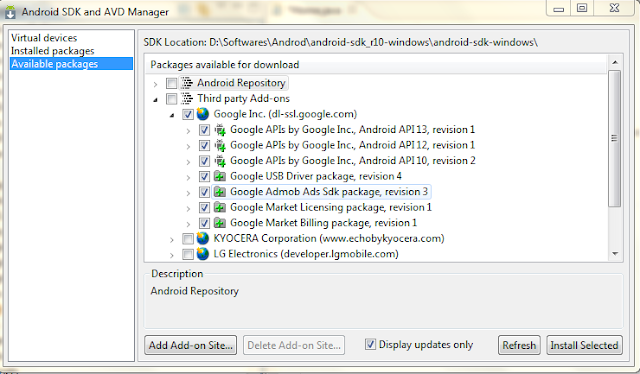
Click On Third Party Add-ons. Then you will find a list like below.
 In that select Google Inc. In that select Google Api with the versions that you want and click on Install selected. Then It will install.
Step 2:
In order to display google maps in you app you have to genarate a MAPKEY .
Obtaining Map Key:
Generating MD5 FingerPrint for your system:

Then you get MD5 Finger print.
Registering Finger Print certificate with the Google Maps service:
<com.google.android.maps.MapView
android:layout_width="fill_parent"
android:layout_height="fill_parent"
android:enabled="true"
android:clickable="true"
android:apiKey="ApiKey"/>
Through coding then do like this
mMapView = new MapView(this, "ApiKey");
Step 4:
Change the Manifast.xml
<application
android:icon="@drawable/icon"
android:label="@string/app_name">
< uses-library android:name="com.google.android.maps" />
<activity
.................
</activity>
</application>
For detail information about google maps go to http://code.google.com/android/add-ons/google-apis/mapkey.html
Step 5:
Displying Google Map
manifast.xml:
<?xml version="1.0" encoding="utf-8"?>
<manifest
xmlns:android="http://schemas.android.com/apk/res/android"
package="com.googlmaps.activities"
android:versionCode="1"
android:versionName="1.0">
<application
android:icon="@drawable/icon"
android:label="@string/app_name">
<uses-library android:name="com.google.android.maps" />
<activity
android:name=".Home"
android:label="@string/app_name">
<intent-filter>
<action android:name="android.intent.action.MAIN"/>
<category android:name="android.intent.category.LAUNCHER" />
</intent-filter>
</activity>
</application>
<uses-permission android:name="android.permission.INTERNET"></uses-permission>
</manifest>
<?xml version="1.0" encoding="utf-8"?>
<com.google.android.maps.MapView
xmlns:android="http://schemas.android.com/apk/res/android"
android:id="@+id/MapView"
android:layout_width="fill_parent"
android:layout_height="fill_parent"
android:clickable="true"
android:apiKey="0QpCkU-U_D--eTiGs8j5jCQ8LnJpyBgyoo7ilqQ"/>
List<Overlay> mapOverlays;
Drawable drawable;
MapOverlays itemizedoverlay;
MapController mc;
//Creating Overlay Items
mapOverlays = mapView.getOverlays();
//Overlay marker
drawable = this.getResources().getDrawable(R.drawable.icon);
itemizedoverlay = new MapOverlays(drawable, Home.this);
//Creation of Geo Point
GeoPoint point = new GeoPoint(19240000,-99120000);
OverlayItem overlayitem = new OverlayItem(point, "", "");
mc.setZoom(10);
mc.animateTo(point);
itemizedoverlay.addOverlay(overlayitem);
mapOverlays.add(itemizedoverlay);
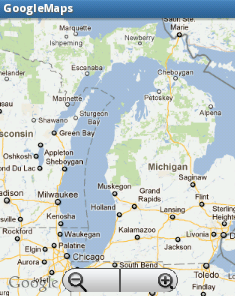
Output:
Step 1: (If you already did this then ignore this step)
Adding Google Maps library to Android SDK :
In Eclipse : Window -> Android Sdk and AVD Manager
Then the following window will appear.

Click On Third Party Add-ons. Then you will find a list like below.
 In that select Google Inc. In that select Google Api with the versions that you want and click on Install selected. Then It will install.
Step 2:
In order to display google maps in you app you have to genarate a MAPKEY .
Obtaining Map Key:
Generating MD5 FingerPrint for your system:
- First we have to find default keystore existing in the system.
- Go to C: -> users -> Your User Name -> .android
- There you find debug.keystore. Copy that keystore by creating a folder in c drive namely keystore.
- Open Command Prompt and follow the image.

Then you get MD5 Finger print.
Registering Finger Print certificate with the Google Maps service:
- Click on the link given. http://code.google.com/android/maps-api-signup.html
- Read the Maps Api Terms and conditions.
- Check on the agree.
- Copy the MD5 in the appropriate field.
- Click on genate Api Key.
Then you will get Map Key.
Step 3:
Adding Map Key to Application
If you want add maps in xml do like this
Step 3:
Adding Map Key to Application
If you want add maps in xml do like this
<com.google.android.maps.MapView
android:layout_width="fill_parent"
android:layout_height="fill_parent"
android:enabled="true"
android:clickable="true"
android:apiKey="ApiKey"/>
Through coding then do like this
mMapView = new MapView(this, "ApiKey");
Step 4:
Change the Manifast.xml
<application
android:icon="@drawable/icon"
android:label="@string/app_name">
< uses-library android:name="com.google.android.maps" />
<activity
.................
</activity>
</application>
For detail information about google maps go to http://code.google.com/android/add-ons/google-apis/mapkey.html
Step 5:
Displying Google Map
manifast.xml:
<?xml version="1.0" encoding="utf-8"?>
<manifest
xmlns:android="http://schemas.android.com/apk/res/android"
package="com.googlmaps.activities"
android:versionCode="1"
android:versionName="1.0">
<application
android:icon="@drawable/icon"
android:label="@string/app_name">
<uses-library android:name="com.google.android.maps" />
<activity
android:name=".Home"
android:label="@string/app_name">
<intent-filter>
<action android:name="android.intent.action.MAIN"/>
<category android:name="android.intent.category.LAUNCHER" />
</intent-filter>
</activity>
</application>
<uses-permission android:name="android.permission.INTERNET"></uses-permission>
</manifest>
main.xml:
<?xml version="1.0" encoding="utf-8"?>
<com.google.android.maps.MapView
xmlns:android="http://schemas.android.com/apk/res/android"
android:id="@+id/MapView"
android:layout_width="fill_parent"
android:layout_height="fill_parent"
android:clickable="true"
android:apiKey="0QpCkU-U_D--eTiGs8j5jCQ8LnJpyBgyoo7ilqQ"/>
Home.java:
package com.googlmaps.activities;
import android.os.Bundle;
import com.google.android.maps.MapActivity;
import com.google.android.maps.MapView;
public class Home extends MapActivity
{
private MapView mapView;
@Override
public void onCreate(Bundle savedInstanceState)
{
super.onCreate(savedInstanceState);
setContentView(R.layout.main);
//Getting Id's
mapView = (MapView)findViewById(R.id.MapView);
//Getting Zoom Buttons
mapView.setBuiltInZoomControls(true);
}
@Override
protected boolean isRouteDisplayed()
{
return false;
}
}
Output:
Step 6:
Adding Overlay Items
In order to add overlays on the map, create another class with the name as MapOverlays with the following options.
While creation mention super class as "com.google.android.maps.ItemizedOverlay"
MapOverlay.java:
package com.googlmaps.activities;
import java.util.ArrayList;
import android.content.Context;
import android.graphics.drawable.Drawable;
import com.google.android.maps.ItemizedOverlay;
import com.google.android.maps.OverlayItem;
@SuppressWarnings("rawtypes")
public class MapOverlays extends ItemizedOverlay
{
private ArrayList<OverlayItem> mOverlays = new ArrayList<OverlayItem>();
public MapOverlays(Drawable defaultMarker, Context context)
{
super(boundCenterBottom(defaultMarker));
}
@Override
protected OverlayItem createItem(int arg0)
{
return mOverlays.get(arg0);
}
@Override
public int size()
{
return mOverlays.size();
}
public void addOverlay(OverlayItem overlay)
{
mOverlays.add(overlay);
populate();
}
}
For the Home.java add these steps:
List<Overlay> mapOverlays;
Drawable drawable;
MapOverlays itemizedoverlay;
MapController mc;
//Creating Overlay Items
mapOverlays = mapView.getOverlays();
//Overlay marker
drawable = this.getResources().getDrawable(R.drawable.icon);
itemizedoverlay = new MapOverlays(drawable, Home.this);
//Creation of Geo Point
GeoPoint point = new GeoPoint(19240000,-99120000);
OverlayItem overlayitem = new OverlayItem(point, "", "");
mc.setZoom(10);
mc.animateTo(point);
itemizedoverlay.addOverlay(overlayitem);
mapOverlays.add(itemizedoverlay);
Output:
click here to download sourcehttp://www.ziddu.com/download/16163615/GoogleMapsEx.zip.html